 |
Corvettecenter>Corvette Tools
Strut Rod Removal Installation Tool
PN: 010-0025A01, 010-0025A02, 010-0025A03
010-0032A01
010-0037A01, 010-0037A02, 010-0037A03
New Design:
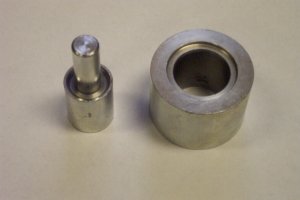
This tool set was designed to make replacing the strut rod bushings in your Corvette a relatively easy task. It is designed to protect the strut rod and remove even the most stubborn bushings.
25A01 - tool set is composed of a driver and a die that will allow you to remove and install bushings using a vise.
25A02 - tool set is composed of driver with a longer alignment pin, and a die with a mounting flange so it can be bolted down in a press. This makes the removal / installation a one person job.
 
Safety First:
When you use any tool you need to wear eye protection, and appropriate clothing to protect yourself and others, and to prevent damage to the item under repair, other equipment and tools. Hard tools such as sockets should not be used to press or hit with a hammer because they will fracture and the shrapnel can cause personal personal injury.
After the part has been removed it should be cleaned and carefully inspected for damage such as cracks, distortions (bending etc.) and corrosion. If the removed part is not good then a replacement should be procured and the defective parts destroyed.
Tools you will need:
- Jack
- Jack Stands
- Wrench set - open / box end.
- � in socket set.
- 4-inch vise or hydraulic press.
- Shock Removal Tool, such as MicroControls 5A01 Shock Removal Tool.
- 3# hammer for shock removal tool.
Parts You will need:
Directions:
- On a stable surface jack up and support your Corvette at the factory hard points. Giving yourself an adequate amount of work space.
- Remove the shock attaching bolts.
- Remove the shock and shock bracket using a "shock removal" so you do not damage the shock bracket threads.
- Mark the camber adjustment cam with a marker so it may be reinstalled in the original position.
- Remove the nuts from the camber adjustment cam and remove the bolts.
- Using a small pry bar on the inside strut rod to remove the rod from the inboard mounting bracket.
- The wheel assembly will want to rotate inward and should be blocked-up to prevent movement.
- Clean and inspect the strut rod and examine eachrod and examine each end for any sign of cracks or deformations that would indicate failure. This is a suspension part and could result in loss of control of the car if it were to fail. If there is any question have it magna fluxed at a local automotive machine shop and if defective, destroy the part and purchase a new one.
- Clean the strut rod holes using a solvent and an abrasive pad before installing new bushings.
- Clean the washers used between the strut rod bushing and the mounting bracket and replace if deformed or broken.
- Using the "ram" and the die from the tool set remove the bushing from the strut rod, by placing the "ram" into the old bushing and placing the "ram" and strut rod over the die and press the bushing out of the strut rod. This procedure is the same for using a vise.
- To install a new strut rod bushing, place the new bushing on the stem of the "ram" and place the "ram" and bushing over the strut rod, and press the new bushing into the strut using the die to back up the strut rod. When the outside edge of the new bushing is flush with the strut rod it is in the proper position.
- If you have purchased the professional edition of this tool (press set) make sure that the pin is aligned in the base hole before pressing. This pin allows a single person to remove and install a bushing in a hydraulic press.
- Once the new bushing are installed it is a good time to paint the strut rod with a medium gloss black paint. They were not originally painted but were covered with the chassis black. If you decide to paint the strut rods mask off the bushings to keep the paint thinners off the rubber parts.
- Clean the camber adjusting cam and bolts being careful not to remove your alignment marks.
- You are now ready to reassemble the restored strut rods back in the rear suspension.
- The bolts and nuts are a grade 8 part and must never be replaced with anything less. Buy a new set when you are ordering your bushings.
- Install new washers or reuse the old ones if they are in good condition when installing the strut rod into the inboard bracket.
- Align the camber adjusting cam and bracket marks. This will allow you to preserve your old alignment. The correct camber alignment must be made by a competent alignment shop.
- Reinstall the Shock mounting bracket, shock absorber, and torque the bolts to factory specification.
Like any fine tool you should take care of it. Clean it and coat with oil to protect the finish and store in clean, dry tool box.
Where to Buy
Back to Corvette tools
Back to Home
|  |

 Products & Services
 Experience
 Who We Are
 Contact Us
 Request More Information


 Products & Services
 Experience
 Who We Are
 Contact Us
 Request More Information