Corvette Tools
Trailing Arm Bushing Installation Tool
PN: 010-00184A02, 010-00184A03
New Design:
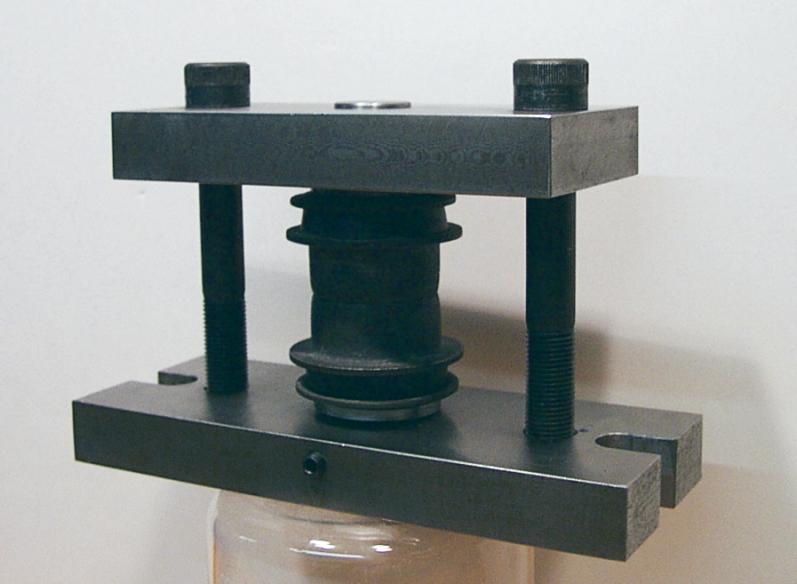
The new assembly tool is designed to produce a perfect flair,
control the bushing compression and eliminate deformation of the
trailing arm. To accomplish this a new assembly tool was designed,
a new sleeve and reinforcement plate (washer) were designed bher) were designed based
on original parts removed from an original car. The assembly tool
holds the bushings, reinforcement plates, and sleeve in perfect
alignment during the press operation. Compression dimension is
controlled by the die set, when fullfully compressed the dies come
together and prevent bushing destruction and trailing arm bending.
It is a one step process - align, flare, limit compression in one
step - works every time .
010-00184A02 - The install tool is used with a press and
used 1/2 SHCS to keep tool aligned.
010-00184A03 - Install tool is used with a press and
uses 1/2 dowels for alignment. It is to bolted into a press to
reduce the assembly time.
010-00184K01 - Two Bushings, two reinforcement plates
and sleeve kit.
010-00184K02 - Two reinforcement plates and sleeve kit.
 
S>
Safety First:
When you use any tool you need to wear eye protection, and
appropriate clothing to protect yourself and others, and to
prevent damage to the item under repair, other equipment and
tools. Hard tools such as sockets should not be used to press or
hit with a hammer because they will fracture and the shrapnel can
cause personal injury.
After the part has been removed it should be cleaned and
carefully inspected for damage such as cracks, distortions
(bending etc.) and corrosion. If the removed part is not good then
a replacement should be procured and the defective parts
destroyed.
Note: Bushings such as Volunteer Vette Products and GM have
been tested and produce perfect assemblies.
Other sleeves are
not to be used, this includes the current GM part. They are too
short. made of the wrong material, incorrect ID and are not
compabable with the tool set.
Sleeve 010-00184M12 has been
fully tested and produces a perfect flare and fit.
Tools you will need:
Jack
Jack Stands
Wrench set - open / box end.
½ in socket set.
hydraulic press.
ttom: 0in">hydraulic press.
hacksaw or saws-all.
3# hammer for shock removal tool.
Parts You will need:
Directions:
On a stable surface jack up and
support your Corvette at the factory hard points. Giving yourself
an adequate amount of work space.
Remove the shock attaching
bolts.
Remove the shock and shock
bracket using a "shock removal" so you do not damage
the shock bracket threads.
Using a small pry bar on the
outside strut rod to remove the rod from the bearing hub.
The wheel assembly will want to
rotate inward and should be blocked-up to prevent movement.
Remove the half shaft from the
companion flange.
Remove brake calipers and
support using a cord or wire.
Remove the cotteE="margin-bottom: 0in">Remove the cotter keys from the
front trailing arm attchment bolt.
If parts are severly rusted you
may use a saws-all to remove bolt.
Remove the Castle nut holding
trailing arm bolt in place, remove the lock washer and flat
washer.
Count the number of shims and
measure the thickness for future assembly.
Remove the bolt with a brass
punch - note the bolt has a small nipple on the end - use a soft
punch.
Remove the old bushings using a
hack saw or saws-all there is nothing to be salvaged but stay
away from the trailing arms.
Clean the trailing arms and
paint if desired.
Install two new bushings into
holes in trailing arms.
Install a new sleeve and
reinforcement plate onto the tool base post.
Place trailing arm on new
sleeve and place a new reinforcement plate onto sleeve.
Install SHCS from top of plate
to bottom of plate. The bottom of screws shall be flush with
botom of tool.
flush with
botom of tool.
Inspect the location of the
washer and sleeve and recenter if necessary.
Lubricate the face of the die
with a good molly grease - spareingly.
Insert tool and trailing arm
into press, align the press ram with the top die center.
Press the part - when the
operation is complete the two dies meet and the pressure or force
on the press increases dramatically.
Remover trailing arm from the
press and remove the tool.
Inspect the perfect flare and note that the sleeve and
reinforcement shall be flush. I not use a file and trim the
sleeve flare.
Like any fine tool you should take care of it. Clean it and
coat with oil to protect the finish and store in clean, dry tool
box.
Where to Buy
Back to Corvette tools
Back
to Home
|
 Products & Services